Your dryer is running, the drum is spinning, but the clothes are coming out just as damp as when they went in nobody wants that surprise after waiting an hour. This guide walks you through every common reason a dryer stops heating, what you can check yourself right now, and when it makes sense to call in a professional.
There’s something uniquely frustrating about a dryer that runs perfectly fine but refuses to actually dry anything. The machine sounds normal. The drum turns. But open that door after a full cycle and you’re met with a pile of cold, damp laundry. It happens more than most people realize, and the good news is that most causes are straightforward once you know what to look for.
[IMAGE PLACEHOLDER FOR IMAGE1]
At Appliance Repair Coquitlam, we see dryer heating problems come in regularly especially during the wetter months when households here are running more laundry than usual. Coquitlam’s damp climate means dryers work harder than they would in drier parts of the country, and that extra use can accelerate wear on some of the components we’ll talk about below. Whether you’re in an older home near Maillardville or a newer build in Burke Mountain, the diagnosis usually comes down to the same handful of causes.
Key takeaways
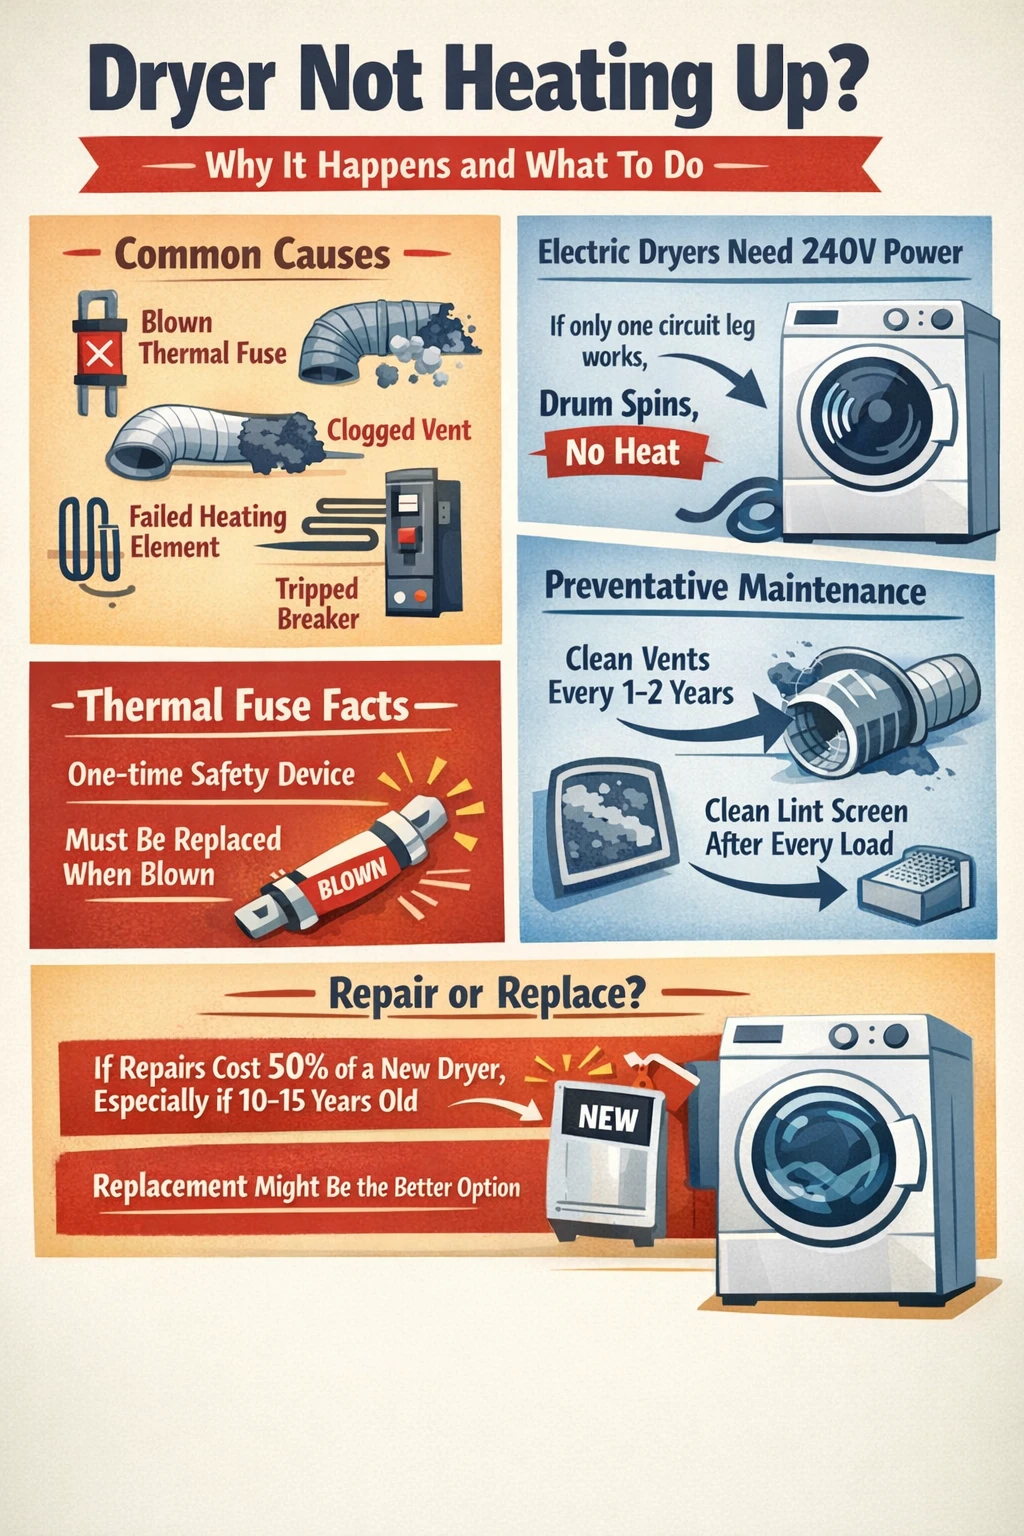
- A dryer not heating up is almost always caused by one of four things: a blown thermal fuse, a failed heating element, a tripped circuit breaker, or a clogged vent system.
- Electric dryers require a full 240-volt supply to heat if only one leg of the circuit is working, the drum will spin but no heat will be produced.
- A thermal fuse is a one-time safety device; once it blows, it must be replaced and cannot be reset.
- Dryer vents should be cleaned at least once every one to two years, and more often if you run multiple loads daily or dry a lot of towels and heavy fabrics.
- If the cost of a repair approaches 50% of what a new dryer would cost, replacement is often the smarter long-term decision, especially on machines older than 10 to 15 years.
- Cleaning the lint screen after every single load is the single simplest thing you can do to prevent heating problems and reduce fire risk.
Why your dryer isn’t heating up

When a dryer runs but produces no heat, the drum motor and the heating system are operating independently of each other. That’s the first thing to understand. The drum spinning tells you the motor is fine it says nothing about whether the heating circuit is working. So a dryer that tumbles but stays cold has narrowed your problem down considerably. You’re looking at either a power supply issue, a failed safety component like a thermal fuse, a damaged heating element, or restricted airflow causing the unit to shut itself down as a precaution.
In our experience, the most common culprits in residential dryers gas or electric are a blown thermal fuse and a clogged exhaust vent. These two problems are also closely related. A clogged vent causes the dryer to overheat, which then blows the thermal fuse. Fix only the fuse without clearing the vent, and you’ll be back to square one within weeks. That’s the part a lot of DIY guides skip, and it’s worth saying plainly.
Gas dryers and electric dryers share some of the same failure points thermostats, thermal fuses, airflow but differ in how they generate heat. Electric models use a heating element (essentially a coiled wire that gets hot when current runs through it), while gas models use a burner ignited by a flame sensor and igniter. Both can fail, but the diagnosis and repair path are different. Gas-related repairs should always go to a professional.
Start here: the easy checks before anything else
Before you pull the dryer away from the wall or order any parts, run through the basics. You’d be surprised how often one of these simple checks solves the problem entirely.
First, check your circuit breaker. Electric dryers run on a 240-volt circuit using two 30-amp breakers tied together. Here’s the tricky part: one breaker controls the motor, the other controls the heat. If only the heating breaker has tripped, your dryer will spin normally but produce zero heat. Go to your panel, find the dryer breakers, and reset both of them even if they don’t look tripped. Unplug the dryer first, reset the breakers, then plug back in and test. This fixes the problem more often than people expect.
For gas dryers, check the gas shutoff valve on the supply line behind the machine. The handle needs to be parallel to the pipe to be open. If it’s sitting perpendicular, no gas is reaching the burner. The drum will still spin, but there’s no heat. It sounds almost too simple, but it’s worth confirming before going any further.
Next, pull out the lint screen and take a look. A heavily clogged lint screen doesn’t just slow drying it restricts airflow enough to cause the heating system to shut down or work inefficiently. Clean it after every load. Every single load. And do a deeper clean with warm water and a soft brush every six months or so to clear any residue from dryer sheets that builds up invisibly on the mesh.
The thermal fuse: the most common reason for a completely cold dryer
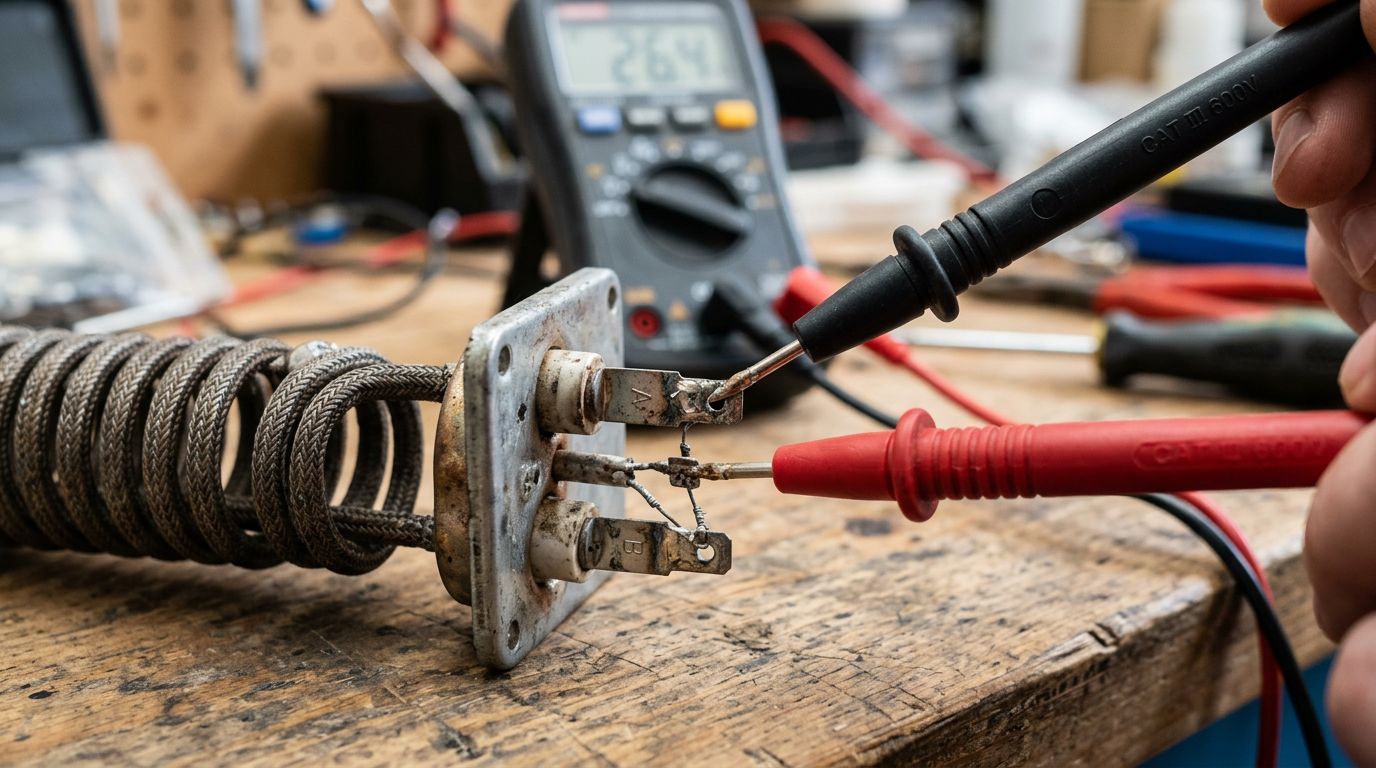
If the easy checks don’t solve it, the thermal fuse is where most diagnostic trails lead. This small component is a legally mandated safety device in all dryers. It’s designed to do one thing: if the internal temperature gets dangerously high, it blows, cutting power to the heating circuit and preventing a fire. Once it blows, it’s done. There’s no resetting it.
The fuse is usually located on the blower housing or near the heating element, depending on the make and model. You’ll need to remove the back panel of the dryer to find it. If you have a multimeter, testing it is straightforward place the probes on each terminal of the fuse and look for continuity. No continuity means the fuse has blown and needs to be replaced.
Replacing the fuse itself is a relatively inexpensive fix, often under $20 for the part. But here’s what matters: a thermal fuse blows because the dryer overheated. It doesn’t overheat for no reason. Almost always, the underlying cause is a clogged exhaust vent. If you replace the fuse without clearing the vent, the new fuse will blow again. Clean the full length of the vent from the back of the dryer to where it exits the house before you reassemble anything.
[IMAGE PLACEHOLDER FOR IMAGE2]
The heating element: when the dryer gets warm but never quite hot enough
An electric dryer’s heating element is a coiled metal wire inside a housing at the back of the drum. Over time, with enough use, that coil can develop a hairline crack or burn out entirely. A fully failed element means no heat at all. A partially failed one a hairline crack that only fails when the coil expands with heat can cause a maddening pattern where the dryer heats for ten minutes, then goes cold mid-cycle.
To check the element, you’ll need to unplug the dryer and remove the back panel. Look for any visible breaks or burn marks on the coil. If it looks fine visually, test it with a multimeter. A working element should show approximately 15 ohms of resistance. A reading of zero or an open circuit (infinite resistance) means it needs to be replaced.
Heating element replacement is a job that some confident DIYers take on, but it does involve disassembling a good portion of the machine. If you’re not comfortable with that, it’s worth calling someone. We handle heating element replacements regularly across the Coquitlam area, and it’s typically a repair that makes sense economically if the dryer isn’t too old.
Vent blockages: the slow problem that becomes a big one
 [IMAGE PLACEHOLDER FOR IMAGE3]
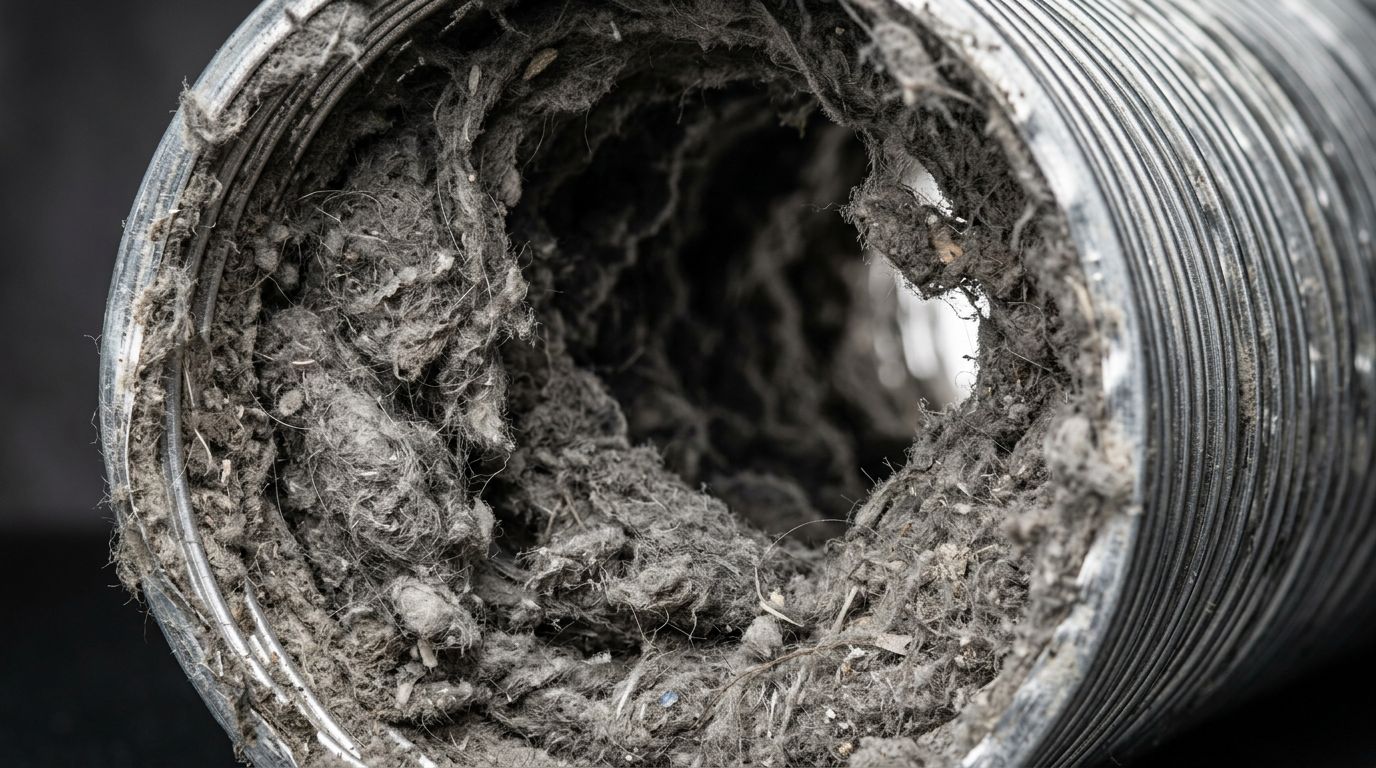
Clogged dryer vents are one of the leading causes of dryer fires in residential homes. They’re also one of the most common reasons a dryer takes two or three cycles to dry a single load. The connection between a blocked vent and a dryer not heating is direct: when hot moist air can’t escape the drum, temperatures inside the machine climb until a safety thermostat or the thermal fuse cuts the heating circuit.
Signs of a blocked vent include clothes that are unusually hot to the touch when you open the door, a laundry room that feels humid during a drying cycle, and drying times that have gradually gotten longer over the past few months. If the vent hose behind your dryer is crushed, kinked, or pressed flat against the wall, that alone can restrict airflow enough to cause problems.
Cleaning a vent properly means working the full length of the duct from the back of the dryer to the exterior exhaust cap on the outside of your home. A long flexible brush designed for dryer vents works well. Pull the exhaust cap off the outside wall and clean from both ends. Vacuum out any debris you loosen. For homes where the vent run is long or takes multiple turns, this is a job worth doing annually. The National Fire Protection Association identifies failure to clean dryers as the leading cause of dryer fires that’s not a small thing.
We see this more in some of the older homes around Port Moody, where vent runs were installed decades ago and haven’t been touched since. Flexible foil ducts that were common in older construction tend to sag, collect lint at the low points, and eventually block almost entirely. If your home still has that style of duct, replacing it with rigid metal ductwork makes a real difference.
Thermostats, cycling issues, and less common causes
If the thermal fuse tests fine, the element is intact, and the vent is clear, the next thing to look at is the thermostat. Dryers typically have more than one: a high-limit thermostat that acts as a backup safety cutoff, and a cycling thermostat that regulates temperature throughout the cycle. Either one can fail in a way that prevents the dryer from heating or causes it to stop heating partway through.
A faulty cycling thermostat is often what’s behind that pattern of a dryer that heats for a while and then goes cold. The thermostat incorrectly reads the drum as having reached the target temperature and cuts the heat off early. Clothes come out warm but still damp. Like the thermal fuse, thermostats can be tested with a multimeter for continuity both should read close to zero ohms when at room temperature.
There are a few other components worth knowing about. Gas dryers have an igniter and a flame sensor (also called a radiant sensor) that work together to ignite and maintain the burner. A failing igniter often shows up as the dryer heating intermittently it works for one cycle, then doesn’t, then does again. A faulty moisture sensor, if your dryer has one, can tell the control board that clothes are dry when they’re not, ending the cycle prematurely. These are less common than thermal fuses or heating elements, but they come up.
Frequently asked questions
These are the questions we hear most often from homeowners dealing with a dryer that won’t heat. If your situation isn’t covered here, a quick call can usually point you in the right direction without needing to schedule anything.
Can a dryer thermal fuse be reset?
No. A thermal fuse is a single-use safety device. Once it blows, it has to be physically replaced there is no reset button, no way to restore it. The more important step is figuring out why it blew in the first place, which is almost always a ventilation problem. Replace the fuse without clearing the vent and the same thing will happen again.
My dryer is getting a little warm but clothes aren’t drying. Is that a heating problem?
It can be, but “warm but not hot enough” points to a slightly different set of causes than a dryer that’s completely cold. A partially clogged vent is the most common reason enough airflow gets through to produce some warmth, but not enough to dry efficiently. A heating element that’s failing but not completely gone can also produce this symptom, as can an electric dryer that’s only receiving 120 volts instead of the full 240. Check the vent first, then the breaker, then consider having the element and thermostat tested.
Is it worth repairing an older dryer that’s not heating?
It depends on the repair cost and the age of the machine. A useful rule of thumb: if the repair would cost 50% or more of what a comparable new dryer costs, replacement usually makes more financial sense. For a dryer that’s more than 15 years old and needing a significant fix, that calculation tilts toward replacement pretty quickly. That said, if the dryer is in decent shape overall and the issue is something like a blown thermal fuse or a thermostat, repair is often the right call these are relatively inexpensive parts and straightforward fixes.
Should I attempt dryer repairs myself?
Some things are genuinely reasonable to try on your own: cleaning the lint screen, clearing the vent, resetting the circuit breaker, and checking the gas valve are all within reach for most homeowners. Once you’re opening up the machine to test or replace internal components, the risk goes up not just of making the problem worse, but of electrical injury if the machine isn’t properly unplugged and discharged. Gas dryer repairs beyond the valve check should always go to a professional. If there’s any burning smell or visible scorch marks, stop using the dryer and call someone before attempting anything yourself.
How often should dryer vents be cleaned?
At minimum, once every one to two years for a typical household. If you’re doing multiple loads a day, drying a lot of bulky items like towels and bedding, or if you’ve noticed drying times creeping up, clean it more frequently. A good sign that it’s overdue: clothes feel hot but still damp when the cycle ends, or the exterior vent flap doesn’t seem to open fully when the dryer is running.
Wrapping up
A dryer not heating up is almost always fixable, and most of the time it comes down to one of three things: a blown thermal fuse (usually tied to a clogged vent), a failed heating element, or a power supply issue. Start with the easy checks the breaker, the gas valve, the lint screen, the vent before assuming you need a major repair. You might save yourself a service call. If you’ve worked through the basics and the dryer is still cold, the next step is getting inside the machine, and that’s where having a professional take a look pays for itself in time and peace of mind.
At Appliance Repair Coquitlam, we handle dryer repair across Coquitlam and the surrounding communities including stove repair, fridge repair, dishwasher repair, and other household appliance work when something else decides to act up at the same time. If your dryer isn’t heating and you’d rather not spend an afternoon troubleshooting it yourself, give us a call and we’ll help you figure out what’s actually going on and what it’ll take to fix it.